Wednesday, September 27, 2023

பருப்புக்குழம்பு/Lentils Gravy

பருப்புக்குழம்பு குமரி மாவட்டத்தின் தனித்துவமான குழம்பு. அங்குள்ள மக்கள் வாரத்தின் பெரும்பாலான நாட்களில் மீன் குழம்பே சாப்பிடுகிறார்கள். மீன் இல்லாத நாட்களில் பருப்புக்குழம்பு வைத்து சாப்பிடுகிறார்கள். அங்கு நடைபெறும் திருமணங்களில், திருமணவிருந்தின் போது சாதத்திற்கு முதன்முதலில் பரிமாறப்படுவது பருப்புக்குழம்பு. அதன்பிறகு தான் சாம்பார் பரிமாறுவார்கள். இந்த பருப்புக்குழம்புடன் சிறிது நெய் மற்றும் அப்பளம் சேர்த்து சாப்பிட சுவை அபாரமாக இருக்கும். எளிதாக விரைவில் செய்து முடிக்கக்கூடிய குழம்பு இது. சைவ சாப்பாடு சாப்பிடும் நாட்களில் இக்குழம்புடன் அவியல் அல்லது மீல்மேக்கர் உருளைக்கிழங்கு கூட்டுஅல்லது உருளைக்கிழங்கு வறுவல் போன்றவை அருமையாக இருக்கும். அசைவ சாப்பாடு சாப்பிடும் நாட்களில் கோழி மசாலா அல்லது மட்டன் மசாலா போன்றவை மிக அருமையாக இருக்கும்.


தேவையான பொருள்கள்

துவரம் பருப்பு - 1 கப்

பச்சை மிளகாய் -2

சின்ன வெங்காயம் - 4

கட்டி பெருங்காயம் - 1/2 செ.மீ துண்டு

தக்காளி சிறியது - 1

உப்பு - தேவையான அளவு

கறிவேப்பிலை - சிறிது

அரைக்க

தேங்காய் துருவல் - 1/2 கப்

சீரகம் - 1/2 டீஸ்பூன்

பூண்டு - 4 பற்கள்

மஞ்சள் பொடி - 1/4 டீஸ்பூன்

மிளகாய் வத்தல் பொடி - 1&1/2 டீஸ்பூன்

தாளிக்க

தேங்காய் எண்ணெய் - 1 டேபிள்ஸ்பூன்

கடுகு -1/4 டீஸ்பூன்

காய்ந்த மிளகாய் - 2

செய்முறை

துவரம் பருப்பை 3 முறை கழுவி ஒரு குக்கரில் எடுத்துக் கொள்ளவும். அதனுடன் பச்சை மிளகாய், பெருங்காயம்,சின்ன வெங்காயம், தக்காளி (4 துண்டுகளாக வெட்டி) சேர்க்கவும்.

பருப்பு வேகும் அளவுக்கு தண்ணீர் சேர்த்து குக்கரை மூடி அடுப்பில் அதிக வெப்பத்தில் வைக்கவும். குக்கரில் ஆவி வந்தவுடன் வெயிட்டை போடவும். இப்போது தீயின் அளவை மிதமாக மாற்றவும். 

சுமார் 15 நிமிடங்கள் மிதமான தீயில் வேகவைத்து அடுப்பை அணைக்கவும். குக்கரின் பிரஷர் போகும் வரைக் காத்திருக்கவும். 

இந்த நேரத்தில் தேங்காய் துருவல், சீரகம், பூண்டு, மஞ்சள், மிளகாய் வற்றல் பொடி ஆகியவற்றை மிக்ஸி ஜாரில் சேர்த்து கொரகொரப்பாக (ஒரு சுற்று சுற்றினால் போதும்.) அரைத்துக்கொள்ளவும். 

குக்கரின் பிரஷர் அடங்கியவுடன் அதைத்திறந்து பருப்பைக் கடைந்து கொள்ளவும். பின் அரைத்து வைத்துள்ள தேங்காயை அதனுடன் கலந்து தேவையான அளவு தண்ணீர் சேர்க்கவும். (குழம்பு அதிக தண்ணியாகவும் இருக்கக்கூடாது அதேநேரத்தில் அதிகளவு கெட்டியாகவும் இருக்கக்கூடாது)

அத்துடன் உப்பு மற்றும் கறிவேப்பிலை சேர்த்து கலக்கி அடுப்பில் அதிகமான தீயில் வைக்கவும். குழம்பு கொதித்து பொங்கி வரும் போது ஒரு கரண்டியை வைத்து கலக்கி விட்டு 2 நிமிடங்கள் கொதிக்கவிட்டு அடுப்பை அணைத்து விடவும்.

ஒரு கடாயில் எண்ணெய் சேர்த்து கடுகு தாளிக்கவும். கடுகு வெடித்ததும் காய்ந்த மிளகாய் வற்றலை கிள்ளி சேர்க்கவும். பின் கறிவேப்பிலை சேர்த்து அடுப்பை அணைக்கவும். இந்த தாளிப்பை குழம்புடன் சேர்க்கவும். சுவையான பருப்புக் குழம்பு தயார்.

குறிப்பு

இதே முறையில் பாசிப்பருப்பு பயன்படுத்தியும் குழம்பு செய்யலாம்.


Lentil gravy is the unique curry of Kumari district. People there used to have fish curry with rice most days of the week. On days when there is no fish available, they have rice with lentil curry. At weddings there, lentil curry is the first dish served during the wedding feast. Sambar will be served only after that. Add ghee and appalam to this gravy and it tastes amazing. This is an easy and quick gravy to make. Avial or Mealmaker potato curry or potato fry are great with this gravy on vegetarian days. Chicken masala or mutton masala are great with this on non-vegetarian days.

Ingredients

Toot Dal/Pigeon pea - 1 cup

Green chillies -2

Shallots - 4

Asafoetida - 1/2 cm piece

Tomatoes (small size) - 1

Salt – as needed

Curry leaves – a few

To Grind

Grated coconut - 1/2 cup

Cumin - 1/2 tsp

Garlic - 4 cloves

Turmeric powder – 1/4 tsp

Chilli powder – 1&1/2 tsp

To season

Coconut oil – 1 tablespoon

Mustard - 1/4 tsp

Dry Red Chillies – 2

Recipe

Wash toor dal/pigeon pea 3 times and take it in a pressure cooker. Add green chillies, asafoetida, shallots, tomatoes (cut into 4 pieces) to it.

Add enough water to cover the lentils and cover the cooker. Heat it on high heat. Once the steam comes out add the weight. Now turn the flame to medium.

Simmer on medium flame for about 15 minutes and switch off the stove. Wait for the pressure of the cooker to release.

At this time add grated coconut, cumin, garlic, turmeric and chilli powder in a mixer jar and grind it coarsely.

Once the pressure of the cooker is released, open it and mash the dal. Then mix the ground coconut with it and add required amount of water. (The gravy should not be too runny and also not too thick)

Also add salt and curry leaves and mix and keep it on high flame on the stove. When the gravy boils, mix it with a spoon and let it boil for 2 minutes and switch off the stove.

Add oil to a pan and add mustard. When the mustard seeds splutter, add dried chillies. Then add curry leaves and switch off the stove. Add this seasoning to the gravy. Delicious lentil gravy is ready.

Note

In the same way, you can also use yellow moong dal to make gravy.

Saturday, September 23, 2023

மீல் மேக்கர் உருளைக்கிழங்கு கூட்டு/Soya chunks & potato curry

மீல்மேக்கர் உருளைக்கிழங்கு கூட்டானது குமரி மாவட்டத்தில் கல்யாணவிருந்தில் பரிமாறப்படும் கூட்டுகளில் ஒன்று. இப்பொழுது கல்யாணவிருந்தில் பெரும்பாலும் பிரியாணி தான். ஆனால் 1980-1990 களில் கல்யாணவிருந்தில் சைவ உணவு தான். அதனால் சைவ இறச்சியாக இந்த மீல்மேக்கரை வைத்து கூட்டு செய்வார்கள். பருப்புக்குழம்பு, சாம்பார், ரசம், மோர் இவற்றோடு அவரவர் வசதியைப் பொறுத்து 5 வகை அல்லது 7 வகை அல்லது 9 வகை கூட்டு பரிமாறுவார்கள். அவற்றில் ஒன்று இந்த மீல்மேக்கர் உருளைக்கூட்டு. இதோடு பச்சைப்பட்டாணியை சேர்க்க விரும்புபவர்கள் பச்சைப்பட்டாணியை வேகவைத்து சேர்த்துக்கொள்ளலாம்.


தேவையான பொருள்கள்

மீல்மேக்கர் - 1/2 கப்

உருளைக்கிழங்கு - 1 பெரியது (சிறியதென்றால் 2)

வெங்காயம் - 1

உப்பு - தேவையான அளவு

இஞ்சி பூண்டு விழுது- 1 டீஸ்பூன்

கறிவேப்பிலை - சிறிது

வறுத்தரைக்க

தேங்காய் துருவல் - 3/4 கப்

மிளகாய்த்தூள் - 1 டீஸ்பூன்

மல்லித்தூள் - 2 & 1/2 டீஸ்பூன்

மஞ்சள் - 1/4 டீஸ்பூன்

சோம்பு - 1/4 டீஸ்பூன்

நட்சத்திரபூ -1

பட்டை - 1 சிறிய துண்டு

கிராம்பு - 2 எண்ணம்

தாளிக்க

தேங்காய் எண்ணெய் - 1 டேபிள் ஸ்பூன்

நட்சத்திரபூ -1

பட்டை - 1 சிறிய துண்டு

கிராம்பு - 2 எண்ணம்

செய்முறை

ஒரு வாணலியை அடுப்பில் வைத்து சூடாக்கி அதில் தேங்காய் துருவலைச் சேர்த்து பொன்னிறமாகும் வரை வறுக்கவும். பொன்னிறமாக மாறியதும் அதனுடன் சோம்பு, நட்சத்திரபூ, பட்டை,கிராம்பு சேர்த்து 1 நிமிடம் வறுத்து பின் மல்லித்தூள், மிளகாய்த்தூள் சேர்த்து 1 நிமிடம் வறுத்துவிட்டு அடுப்பிலிருந்து இறக்கி வேறொரு தட்டிற்கு மாற்றவும். 

ஒரு பாத்திரத்தில் 1 1/2 கப் தண்ணீர் சேர்த்து கொதிக்கவிடவும். தண்ணீர் கொதித்தும் மீல்மேக்கரை சேர்த்து ஒரு கொதிவரும் வரை வைத்திருந்து பின் அடுப்பை அணைத்து பாத்திரத்தை மூடி 10 நிமிடங்கள் வைத்திருக்கவும். 10 நிமிடங்கள் கழித்துப் பார்க்கும் போது மீல்மேக்கர் நன்கு ஊறி இருக்கும். இப்போது தண்ணீரை வடித்து விட்டு சிறுது ஆறவிடவும். ஆறியபின் சிறிது மீல்மேக்கரை கையில் எடுத்து அதில் இருக்கும் தண்ணீரை பிழிந்து விடவும். இப்படியே எல்லா மீல்மேக்கரிலும் இருக்கும் தண்ணீரை பிழிந்துவிடவும்.

வெங்காயத்தை பொடியாக அரிந்து வைக்கவும். உருளைக்கிழங்கை நன்கு கழுவி, தோல் சீவி 2 செ.மீ அளவுள்ள துண்டுகளாக வெட்டி வைக்கவும்.

இப்போது வாணலி ஒன்றை அடுப்பில் வைத்து, அதில் எண்ணெய் விட்டு பட்டை,கிராம்பு,நட்சத்திரப்பூ சேர்க்கவும்.

பின்பு பொடியாக அரிந்த வெங்காயம் சேர்த்து வதக்கவும். பின் இஞ்சி பூண்டு விழுது சேர்த்து வதக்கவும்.பின் வெட்டிவைத்த உருளைக்கிழங்கு மற்றும் உப்பு சேர்த்து கிளறவும். 1 நிமிடம் வதக்கி பின் உருளைக்கிழங்கு வேகத்தேவையான அளவு தண்ணீர் சேர்த்து மூடி வைத்து இளந்தீயில் வேகவைக்கவும். 

இதற்கிடையே வறுத்து ஆற வைத்திருந்த தேங்காய் மற்றும் இதர பொருள்களை மிக்சியில் சேர்த்து அதனுடன் மஞ்சள் தூள் மற்றும் தண்ணீர் சேர்த்து அரைத்துக்கொள்ளவும்.

உருளைக்கிழங்கு வெந்தவுடன், அரைத்த தேங்காய் விழுது மற்றும்  சிறிதளவு தண்ணீர் சேர்த்து கலக்கவும். பின் தயார் செய்து வைத்திருக்கும் மீல்மேக்கரை அதனுடன் சேர்க்கவும். மீல்மேக்கர் மற்றும் தேங்காய் விழுதுக்கு ஏற்ற அளவு உப்பு சேர்க்கவும். ஏற்கெனவே உருளைக்கிழங்கிற்கு உப்பு சேர்த்திருப்பதால் குறைந்த அளவு உப்பு இப்பொழுது சேர்த்தால் போதும். கறிவேப்பிலையை சேர்த்துக் கிளறி கூட்டு நன்றாக கொதித்து சுண்டும் வரை வைத்திருந்து அடுப்பிலிருந்து இறக்கவும்.


குறிப்பு

இந்தக்கூட்டை குழம்பாக செய்து சப்பாத்தி,சாதத்திற்கு பரிமாறலாம். அதற்கு, தேங்காய் விழுது சேர்த்த பின், குழம்பிற்கு தேவையான அளவு தண்ணீர் சேர்த்து கொதிக்க வைத்து குழம்பு தயார் செய்யலாம்.

இந்தக்கூட்டுடன் பச்சைப்பட்டாணியும் சேர்த்துக் கொள்ளலாம். அதற்கு 1/4 கப் பச்சைப்பட்டாணியை 8 மணிநேரம் ஊறவைத்து, உப்பு சேர்த்து வேகவைத்து, உருளைக்கிழங்கு வெந்தபிறகு தேங்காய் விழுது சேர்த்தபின் பச்சைப்பட்டாணியும் சேர்த்து வேகவைக்கவும்.

Meal maker/Soya chunks potato curry is one of the curries served at wedding feasts in Kumari district. Biryani is mostly served at weddings, now a days. But in the 1980s and 1990s, only vegetarian food was served at weddings. So, they considered this meal maker/soya chunks as vegetarian meat. 5 or 7 or 9 types of curries along with dal, sambar, rasam, buttermilk are served at wedding feast. Soya chunks potato curry is one among them.

Ingredients

Meal maker/Soya chunks - 1/2 cup

Potato – 1 big (2 if small)

Onion - 1

Salt – as needed

Ginger garlic paste- 1 tbsp

Curry leaves – a little

Dry roast

Grated Coconut - 3/4 cup

Chili powder - 1 tbsp

Coriander powder– 2 & 1/2 tsp

Turmeric powder - 1/4 tsp

Fennel seeds - 1/4 tsp

Star Anise -1

Cinnamon stick - 1 small piece

Cloves - 2

To season

Coconut oil – 1 tablespoon

Star Anise -1

Cinnamon stick- 1 small piece

Cloves - 2

Recipe

Heat a pan on the stove and add grated coconut and fry until golden brown. When it turns golden brown, add fennel seeds, star anise, cinnamon, cloves and fry for 1 minute, then add coriander and chilli powder and fry for 1 minute, remove from the stove and transfer to another plate.

Boil 1 1/2 cups of water in a pot. Add soya chunks to the boiling water and bring to a boil, then turn off the stove and cover the pot for 10 minutes. After 10 minutes drain the water from soya chunks and let it cool a little. After it cools down take some soya chunks in your hand and squeeze the water out of it. Similarly squeeze all the water out of the soya chunks.

Chop the onion finely. Wash the potatoes well, remove the skin and cut into 2 cm cubes.

Now place a pan in the stove, add oil to it and add cinnamon, cloves and star anise.

Then add finely chopped onions and saute. Then add ginger and garlic paste and saute. Then add chopped potatoes, salt and stir. Saute for 1 minute and then add water as required for potatoes and cover and cook on low flame.

Meanwhile add the roasted coconut and other ingredients to the mixer and grind it along with turmeric powder and water.

Once the potatoes are cooked, add ground coconut paste, little water and mix. Then add the prepared soya chunks to it. Add salt to suit the soya chunks and coconut paste. Since the potatoes are already salted, adding a small amount of salt is enough now. Stir in the curry leaves and keep it until it is done and then remove from the stove.

Note

This curry can be made into gravy and served with chapati and rice. For that, after adding the coconut paste, add required amount of water to the gravy and boil it to prepare the gravy.

Green peas can also be added to this curry. For that, soak 1/4 cup of green peas for 8 hours, add salt and boil. Once potatoes are cooked, add coconut paste and boiled green peas too. 

Monday, September 18, 2023

கணவாய் கூட்டு/கணவாய் குழம்பு/Squid Curry/Squid Gravy

தேவையான பொருட்கள்

கணவாய் பெரியது - 1

சின்ன வெங்காயம் - 10 எண்ணம்

இஞ்சி பூண்டு விழுது- 1 டீஸ்பூன்

தேங்காய் துருவல் - 3/4 கப்

மஞ்சள் - 1/4 டீஸ்பூன்

மிளகாய்த்தூள் - 1 டீஸ்பூன்

மல்லித்தூள் - 2 & 1/2 டீஸ்பூன்

சோம்பு - 1/4 டீஸ்பூன்

நட்சத்திரபூ -1

கிராம்பு - 2 எண்ணம்

உப்பு - தேவையான அளவு

தேங்காய் எண்ணெய் - 1 டேபிள் ஸ்பூன்

கறிவேப்பிலை - சிறிது


செய்முறை

கணவாயை கழுவி சுத்தப்படுத்திக்கொள்ளவும். அதற்கு கணவாயின் தலையை அதன் உடம்பிலிருந்து பிரித்து எடுக்கவும். தலையுடன் அதன் குடல் சேர்ந்தே வெளிவரும்.  அதன் குடல் பகுதியில் கறுப்பு மை இருக்கும்.அதை நீக்கி விடவும். அந்த மையானது சிறிய பையில் இருக்கும். அந்த பை உடைந்து விடாமல் அதன் குடலிலிருந்து கவனமாக நீக்கி விடவும். பல நேரங்களில் அந்தப்பை உடைந்துவிடும். அப்படி உடைந்துவிட்டால் தண்ணீர் குழாயை திறந்து விட்டு  நன்கு கழுவி எடுத்துக்கொள்ளவும். அதன் தலைப்பகுதியில் கல் போன்ற ஒன்று இருக்கும். அதையும் நீக்கி விடவும். 

                                      Squid Cleaning Video

அதன் உடம்பு பகுதியில் கணவாய் நாக்கு இருக்கும். அது நமக்குத் தேவையில்லை. அதை நீக்கி விடவும். உடம்பு பகுதியில் நிறைய அழுக்குகள் இருக்கும். அவற்றை சுத்தப்படுத்த வேண்டும். உடம்பு பகுதியை இரண்டு அல்லது மூன்றாக வெட்டி சுத்தப்படுத்தவும். உடல் பகுதியையும் தலைப்பகுதியையும் நன்றாகக் கழுவிக்கொள்ளவும். பின்னர் 1 செ.மீ. அளவுள்ள துண்டுகளாக கணவாயை வெட்டிக்கொள்ளவும். 


ஒரு வாணலியை அடுப்பில் வைத்து சூடாக்கி அதில் தேங்காய் துருவலைச் சேர்த்து பொன்னிறமாக மாறும் வரை வறுக்கவும். பொன்னிறமாக மாறியதும் அதனுடன் மல்லித்தூள், மிளகாய்த்தூள் சேர்த்து 1 நிமிடம் வறுத்துவிட்டு அடுப்பிலிருந்து இறக்கி வேறொரு தட்டிற்கு மாற்றி ஆற வைக்கவும். 

இப்போது வாணலி ஒன்றை அடுப்பில் வைத்து, அதில் எண்ணெய் விட்டு சோம்பு,கிராம்பு,நட்சத்திரப்பூ சேர்க்கவும்.

பின்பு பொடியாக வெட்டிய சின்ன வெங்காயம் சேர்த்து 3 நிமிடங்கள் வதக்கவும். பின் இஞ்சி பூண்டு விழுது சேர்த்து வதக்கவும்.பின் வெட்டிவைத்த கணவாய் மற்றும் உப்பு சேர்த்து கிளறி மூடி வைத்து இளந்தீயில் வேகவைக்கவும். தண்ணீர் விடத்தேவையில்லை. கணவாயிலிருக்கும் தண்ணீர் போதுமானது.

தண்ணீர் வற்றி வரும் போது கணவாய் முக்கால் பதம் வெந்திருக்கும். வறுத்து ஆற வைத்திருக்கும் தேங்காய் கலவையுடன் மஞ்சள் மற்றும் தண்ணீர் சேர்த்து அரைத்துக் கொள்ளவும். 

அரைத்த தேங்காயை வெந்துகொண்டிருக்கும் கணவாயுடன் சேர்த்து சிறிது தண்ணீர் சேர்த்து வேகவைக்கவும். ஏற்கெனவே கணவாய்க்கு உப்பு சேர்த்திருப்பதால் தேவைப்பட்டால் இப்பொழுது சிறிது உப்பு சேர்த்துக் கொள்ளவும். கணவாய் கூட்டாக வைக்கவேண்டுமென்றால் சிறிதளவே தண்ணீர் சேர்க்கவும். குழம்பாக வைக்கவேண்டுமென்றால் குழம்புக்குத் தேவையான அளவு தண்ணீர்,உப்பு சேர்த்து கொதிக்க வைக்கவும்.

குழம்பு நன்கு கொதித்து, கணவாய் வேகும் வரை வைத்திருந்து கறிவேப்பிலை சேர்த்து பின்பு அடுப்பிலிருந்து இறக்கவும். சூடான சாதத்துடன் பரிமாறவும்.


Ingredients

Squid - 1 large

Shallots - 10 no.s

Ginger garlic paste- 1 tsp

Grated Coconut - 3/4 cup

Turmeric - 1/4 tsp

Chilli powder - 1 tsp

Coriander - 2 & 1/2 tsp

Star Anise - 1

Fennel seeds - 1/4 tsp

Cloves - 2 no.s

Salt – as needed

Coconut oil – 1 tablespoon

Curry leaves – a few

Recipe

Wash and clean the Squid. For that separate the head of the squid from its body. Along with the head comes out its guts. There will be black ink in its intestinal area. The ink will be in the ink sac. Carefully remove the ink sac without squeezing it. If you squeeze, it will break. If it breaks, open the water tap and wash it thoroughly. Remove a stone kind of thing from its head. 

Remove the pen from its body part(pen gives structural support to squid). There will be a lot of dirt in the body area. Clean them up. Cut the body part into two or three and clean it. Then cut squid into bite-sized pieces.

Heat a pan on the stove and add grated coconut to it and fry till it turns golden brown. When it turns golden brown, add coriander powder and chili powder and fry for 1 minute, remove from stove and transfer to another plate to cool.

Now place a pan on the stove, add oil to it and add fennel seeds, cloves and star anise.

Then add finely chopped onion and saute for 3 minutes. Then add ginger and garlic paste and saute. After that add chopped squid and salt, stir and cover and cook on low flame. No need to water. Squid will release sufficient water for it to cook.

Once the squid is three-quarters cooked. Grind the roasted coconut mixture with turmeric and water.

Add ground coconut paste to squid and add little water. Now add some salt if needed as the squid is already salted. 

Boil the gravy well, keep it until the squid is cooked, add curry leaves and then remove from the oven. Serve with hot rice.

Thursday, September 14, 2023

நெல்லிக்காய் சாதம்/Gooseberry Rice/Amla Rice

நெல்லிக்காயில் அதிகப்படியான வைட்டமின் 'சி' சத்து நிறைந்துள்ளது. நெல்லிக்காய் அதிகம் கிடைக்கும் காலத்தில் பச்சையாகவே பயன்படுத்தலாம். நெல்லிக்காயை வெயிலில் காயவைத்து பயன்படுத்தினாலும் அதன் சத்து குறையாது. எனவே நெல்லிக்காய் சீசன் நேரங்களில் வாங்கி அதை நன்கு கழுவி சிறிது சிறிதாக வெட்டி வெயிலில் நன்கு காய வைத்து நெல்லிக்காய் வற்றல் செய்து கண்ணாடி புட்டிகளில் அடைத்து வைத்துக்கொண்டால் வருடம் முழுவதும் பயன்படுத்தலாம். பள்ளி செல்லும் குழந்தைளுக்கும் அலுவலகம் செல்லும் பெரியவர்களுக்கும் வாரத்தில் ஒரு நாள் நெல்லிக்காய் சாதம் கட்டி தரலாம். நெல்லிக்காய் சாதம் மிக குறைந்த நேரத்தில் எளிதாக செய்யக்கூடியது.அதனால் காலை நேரத்தில் அவசரமாக செய்வதற்கு ஏற்ற ஒரு சாதம் வகை இது.


தேவையான பொருள்கள்

நெல்லிக்காய் -1

வேகவைத்த சாதம் - 3 கப்

முழு உளுந்து அல்லது கடலைப்பருப்பு - 1 1/2 டேபிள்ஸ்பூன்

பெருங்காயப்பொடி - 1 சிட்டிகை

மஞ்சள் தூள் - 1 சிட்டிகை

மிளகாய்த் தூள் - 1/8 டீஸ்பூன் அல்லது காரத்திற்கு ஏற்றவாறு

உப்பு -தேவையான அளவு

நல்லெண்ணெய் - 1 டேபிள்ஸ்பூன்

கறிவேப்பிலை - சிறிது

வற்றல் மிளகாய் - 1

கடுகு - 1/4 டீஸ்பூன்

செய்முறை

நெல்லிக்காயை கழுவி காரட் துருவியில் சிறிய துளையில் வைத்து துருவிக்கொள்ளவும்.

கடாயைச் சூடாக்கி நல்லெண்ணெய் விட்டு, கடுகு தாளிக்கவும். பின் உளுந்தை சேர்த்து பொன்னிறமாக வரும் வரை வறுக்கவும். 

பின்னர் வற்றல் மிளகாயை இரண்டாக பிய்த்து சேர்க்கவும். பின்னர் துருவி வைத்துள்ள நெல்லிக்காயை சேர்த்து 3 நிமிடங்கள் வதக்கவும். இப்பொழுது நெல்லிக்காய் பாதி வெந்திருக்கும். 

இந்த நிலையில் 1/2 கப் தண்ணீர் சேர்த்து கொதிக்கவைக்கவேண்டும். சேர்த்த தண்ணீர் கொதிக்கும் போது அதில் மஞ்சள் தூள், மிளகாய்த் தூள், பெருங்காயத்தூள் மற்றும் உப்பு,கறிவேப்பிலை சேர்க்கவும். 

இவற்றை சேர்த்த பின் 2 லிருந்து 3 நிமிடங்கள் வரை வேக வைத்திருந்து பின் அடுப்பிலிருந்து இறக்கவும். இறக்கியவுடன் வேகவைத்த சாதத்தை சேர்த்துக்கிளறவும். அருமையான நெல்லிக்காய் சாதம் தயார். 

இத்துடன் வேகவத்த முட்டை மற்றும் உருளைக்கிழங்கு வறுவல் சேர்த்து சாப்பிட அட்டகாசமாக இருக்கும். உருளைக்கிழங்கு வறுவல் ரெசிபியைக்காண இங்கே க்ளிக் செய்யவும்.

Gooseberry is rich in vitamin 'C'. Gooseberry can be used raw when it is in season. Even if the gooseberry is dried in the sun, its nutritional value does not change. So buy gooseberry during the season, wash it well, cut it into small pieces, dry it well in the sun and store it in glass jars, it can be used throughout the year. Gooseberry rice can be packed once a week for school going children and office going adults. Gooseberry rice is easy to make in a very short time. 

Ingredients

Gooseberry -1

Boiled rice - 3 cups

Urad dal or Channa dal - 1 1/2 tbsp

Asafoetida powder – 1 pinch

Turmeric powder – 1 pinch

Chilli powder – 1/8 tsp (adjust according to spiciness)

Salt – required quantity

Gingelly oil/Sesame oil - 1 tablespoon

Curry leaves – a few

Chillies – 1

Mustard - 1/4 tsp

Method

Wash the gooseberry and grate it with a grater. Use the small size to grate.

Heat a pan, add Gingelly oil/Sesame oil and season with mustard. Then add urad dal and fry until golden brown.

Then add the dry chilli crushed in two. Then add grated gooseberry and saute for 3 minutes. Now the gooseberry is half cooked.

At this stage add 1/2 cup of water and boil it. When the added water boils, add turmeric powder, chilli powder, asafoetida powder and salt and curry leaves.

After adding these, cook for 2 to 3 minutes and then remove from the fire. Add boiled rice and mix. Delicious gooseberry rice is ready.

Serve with boiled egg and fried potatoes.

Click here for fried potato recipe

Tuesday, September 12, 2023

ராகி புட்டு/கேழ்வரகு புட்டு/Ragi Puttu/Finger Millet Puttu

ராகி/கேழ்வரகு புட்டு செய்வது மிகவும் எளிதானது. ராகியில் கால்சியம் சத்து நிறைந்துள்ளதால் அடிக்கடி ராகி/கேழ்வரகு உணவை நம் உணவுப் பட்டியலில் சேர்த்துக் கொள்ளவேண்டும். ராகி மாவு இப்பொழுது கடைகளில் ரெடிமேடாகவே கிடைக்கிறது. ரெடிமேடாக கிடைக்கும் மாவை பயன்படுத்த விரும்பாதோர் வீட்டிலேயே மாவு தயார் செய்து கொள்ளலாம். 

ராகி மாவு தயாரிக்கும் முறை

முழு ராகியை கடையிலிருந்து வாங்கி, அதில் இருக்கும் அழுக்குகள், சிறு சிறு கற்கள், போன்றவை போகும் வரை நன்றாக கழுவி எடுத்துக் கொள்ளவேண்டும். மொட்டைமாடியில் ஒரு காட்டன் துணியை விரித்து அதில் கழுவி வைத்துள்ள ராகியை பரப்பி வெயிலில் நன்றாக காய வைக்க வேண்டும். நன்றாக வெயில் இருந்தால் 4 முதல் 5 மணி நேரத்திற்குள் காய்ந்து விடும். காய்ந்த ராகியை மிக்சியில் அல்லது மாவு மில்லில் கொடுத்து பொடித்து மாவாக்கிக் கொள்ளவும். 


தேவையான பொருள்கள்

ராகிகேழ்வரகு மாவு - 1 1/2 கப்

தேங்காய் துருவல் - 1/2 கப்

உப்பு- தேவையான அளவு

செய்முறை

வாணலி்யை சூடாக்கி, எண்ணெய் எதுவும் சேர்க்காமல் ராகியை வறுத்துக் கொள்ளவும்.மிதமான தீயில் மணம் வரும் வரை (சுமார் 5 நிமிடங்கள்) வறுக்கவும். 

வறுத்த ராகியை ஒரு தட்டில் கொட்டி ஆறவிடவும். ஆறிய பின் ராகி மாவில் உப்பு சேர்த்து கலக்கவும். 

பின் ராகி மாவில் சிறிது சிறிதாக தண்ணீர் தெளித்து கட்டியில்லாமல் பிசையவும். மாவை உருண்டையாக பிடித்துவிட்டு, அந்த உருண்டையை உடைத்து உதிர்க்கும் போது திரும்பவும் மாவு பதத்திற்கு வந்துவிட்டால் புட்டு மாவு பதம் சரி என்று அர்த்தம். 

புட்டு குடத்தில் பாதி அளவு தண்ணீர் நிறைத்து அடுப்பில் வைத்து கொதிக்க வைக்கவேண்டும். 

புட்டு குழாயில் முதலில் தேங்காயை பரப்பி பின் தயார் செய்து வைத்துள்ள புட்டு மாவு சேர்க்கவும். அதன் பின் தேங்காய் சேர்த்து பின் புட்டு மாவு சேர்க்கவும். இப்படியே புட்டு குழாய் நிறையும் வரை தேங்காய், புட்டு மாவு என்று மாறி மாறி சேர்க்கவும். 

பின் புட்டு குழாயை, புட்டு குடத்தில் பொருத்தி வைத்து வேகவிடவும். புட்டு வெந்தவுடன் புட்டு குழாயின் மேலிருந்து ஆவி வரும். ஆவி வந்த பின் 5 நிமிடங்கள் வேகவிட்டு பின் அடுப்பிலிருந்து இறக்கி, புட்டை ஒரு நீள கரண்டியின் பின் பக்கத்தின் உதவியுடன் வெளியே தள்ளவும். 

இப்போது சுட சுட ராகி புட்டு தயார். வேக வைத்த பச்சைப்பயிறு, நாட்டுச்சர்க்கரை, வாழைப்பழம் சேர்த்து புட்டை சுவைக்கலாம்.


மேலும் சில ராகி ரெசிபிகளை பார்க்க கீழே உள்ள லிங்கை க்ளிக் செய்து பார்க்கவும்.

ராகி இட்லி ரெசிபியை காண இங்கே க்ளிக் செய்யவும்.


Ragi Puttu/Finger millet puttu is very easy to make. Since Ragi/Finger millet is rich in calcium, we should include Ragi/Finger millet in our diet regularly. Ragi flour is now readily available in stores. Those who do not want to use ready-made flour can prepare flour at home.

Ragi flour preparation method

Buy whole Ragi from the store and wash it thoroughly until all dirt, small stones etc. are removed. Spread a cotton cloth on the terrace and spread the washed ragi on it and dry it well in the sun. If it is sunny it will dry within 4 to 5 hours. Grind the dry ragi in a mixer or flour mill.

Ingrdients

Ragi/Finger millet flour - 1 1/2 cups

Grated coconut - 1/2 cup

Salt – as needed

Recipe

Heat a pan and fry ragi without adding any oil. Fry on medium heat until fragrant (about 5 minutes).

Transfer the roasted ragi on a plate and let it cool. After cooling, transfer to a bowl and add salt to ragi flour and mix.

Then sprinkle water little by little on the ragi flour and mix it without lumps. The flour shouldn't be too watery or too dry. It should be wet but not watery. 

Fill the puttu maker pot with water till half and bring it to boil.

First spread the coconut in the puttu maker tube and then add the prepared wet flour. After that add coconut and then add wet flour. Add coconut and wet flour alternately until the puttu maker tube is full.

Then attach the puttu maker tube to the puttu maker pot and steam it. Once the puttu is cooked steam will come from the top of the puttu maker tube. After steaming for 5 minutes, remove from the fire and push out the puttu with the back of a long laddle or with the wooden stick.

Now the ragi puttu is ready to eat. Serve puttu with boiled green gram, sugar and banana.

Friday, September 8, 2023

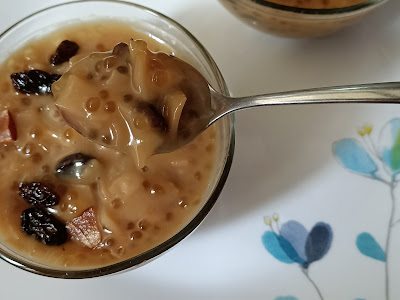
அடை பாயாசம்/அடை பிரதமன்/Ada Payasam

கேரளாவில் பிரசித்தி பெற்ற பாயாசம் அடை பாயாசம். அடை பாயாசம் அங்கு அடை பிரதமன் என்று அழைக்கப்படுகிறது. கேரளாவில் பெரும்பாலும் அரிசி அடை வைத்தே அடை பிரதமன் செய்கிறார்கள். தமிழ்நாட்டில் பெரும்பாலும் மைதா அடை வைத்து அடை பாயாசம் செய்யப்படுகிறது. மைதா அடை பாயாசத்திற்கும் அரிசி அடை பாயாசத்திற்கும் செய்முறையில் சிறிது வித்தியாசம் உண்டு. அதேப்போன்று சுவையிலும் சிறிது வித்தியாசம் இருக்கும். 


தேவையான பொருட்கள்

மைதா அடை - 1/2 கப்

ஜவ்வரிசி - 1/4 கப்

கெட்டி தேங்காய் பால் - 1 கப்

தண்ணீர் - 3 1/2 கப்

பொடித்த வெல்லம் - 1 கப்

நெய் - 3 டேபிள்ஸ்பூன்

ஏலக்காய் - 4

முந்திரிபருப்பு - 2 டேபிள்ஸ்பூன்

உலர்ந்த திராட்சை -  2 டேபிள்ஸ்பூன்

தேங்காய் துண்டுகள்(சிறிதாக நறுக்கியது) -  2 டேபிள்ஸ்பூன்

செய்முறை

உடைத்த அடை

அடையை 1/2 செமீ அளவுக்கு சிறிது சிறிதாக உடைத்துக்கொள்ளவும்.ஒரு கடாயை சூடாக்கி, அடையை வறுத்துக் கொள்ளவும். எண்ணெய் எதுவும் விடாமல் வறுக்கவேண்டும். அடையின் வெள்ளை நிறம் மாறி இளம் பொன்னிறமாக மாறும் வரை வறுக்கவும். அப்போது தான் பாயாசம் செய்யும் போது ஒன்றுடன் ஒன்று ஒட்டாமல் இருக்கும்.வறுத்த அடையை ஒரு தட்டிற்கு மாற்றவும்.

வறுத்த பின்பு


இப்போது அதே கடாயில் நெய் சேர்த்து முந்திரி பருப்பு சேர்த்து பொன்னிறமாக வறுத்து வேறு தட்டிற்கு மாற்றவும். பின் அதே கடாயில் உலர்ந்த திராட்சை சேர்த்து வறுத்து வேறு தட்டிற்கு மாற்றவும். பின்னர் அதே கடாயில் தேங்காய் துண்டுகள்(சிறிதாக நறுக்கியது) சேர்த்து பொன்னிறமாக வறுத்து வேறு தட்டிற்கு மாற்றவும்.

ஒரு அடிகனமான வாயகன்ற பாத்திரத்தில் மேற்கூறிய அளவு தண்ணீர் ஊற்றி கொதிக்க விடவும். கொதிவந்தவுடன் அதில் ஜவ்வரிசியை சேர்க்கவும். சேர்த்தவுடன் ஒரு கரண்டியை வைத்து கலக்கவும். இப்படி செய்வதால் ஜவ்வரிசி பாத்திரத்தில் ஒட்டாது. 

பின்பு பாத்திரத்தை மூடி வைத்து ஜவ்வரிசியை வேகவைக்கவும். இடையிடையே ஒரு கரண்டியை வைத்து கிளறி விடவும். இல்லையென்றால் பாத்திரத்தின் அடியில் ஜவ்வரிசி ஒட்டிக்கொள்ளும்.

ஜவ்வரிசி பாதி வெந்தவுடன் அடையை சேர்த்துக் கிளறவும்.பாத்திரத்தை மூடாமல் அடையை வேகவைக்கவும். மூடி வைத்தால் பொங்கி வழியும். எனவே மூடுவதை தவிர்க்கவும். 

இடையிடையே ஒரு கரண்டியை வைத்து கிளறி விடவும். அடை நன்கு வேகும் வரை வேகவைக்கவும். அடை வெந்துவிட்டதா என்பதை அறிய ஒரு சிறிய துண்டை எடுத்து சாப்பிட்டு பார்க்கவும். அடை வெந்து வரும் போது ஜவ்வரிசியும் கண்ணாடி போன்று வெந்துவிடும். 

இப்போது ஏலக்காயை இடிகல்லில் வைத்து தட்டி சேர்க்கவும். பின்பு வெல்லத்துடன் சிறிது தண்ணீர் சேர்த்து கொதிக்க வைத்து வடிகட்டி சேர்க்கவும். சுத்தமான வெல்லமாக இருந்தால் வடிகட்டதேவையில்லை. 

வெல்லம் சேர்த்தபின் கரண்டி வைத்து நன்கு கலக்கவும். பின்னர் தேங்காய்ப்பால் சேர்த்து கலக்கவும். 

தேங்காய்ப்பால் சேர்த்து ஒரு கொதி வந்தவுடன் வறுத்து வைத்திருக்கும் முந்திரிபருப்பு,உலர்ந்த திராட்சை,தேங்காய்த்துண்டுகள் சேர்த்து கிளறி அடுப்பிலிருந்து இறக்கிவிடவும். வெகு நேரம் கொதித்தால் தேங்காய்ப்பால் திரிந்துவிடும். இப்போது சுவையான அடை பாயாசம் தாயார். 

இந்த பாயாசத்துடன் வாழைப்பழம் மற்றும் அப்பளம்/பப்படம் சேர்த்து சுவைத்தால் மிக அருமையாக இருக்கும்.


குறிப்பு

புதிதாக உடைத்த தேங்காயைத் துருவி சிறிதளவு இளஞ்சூடான நீர் ஊற்றி கெட்டித்தேங்காய்ப்பால் எடுத்துக்கொள்ளவும்.வீட்டில் தேங்காய்ப்பால் செய்வது சிரமமாக இருந்தால் கடையில் ரெடிமேடாக கிடைக்கும் தேங்காய்ப்பால் வாங்கி பயன்படுத்தலாம். வீட்டில் தேங்காய்ப்பால் செய்வதே ஆரோக்கியமானதாக இருக்கும் அதுமட்டுமல்லாமல் பாயாசத்தின் சுவையும் மாறுபடும்.

Adai Payasam is a popular payasam in Kerala. Adai Payasam is called Ada Prathaman there. In Kerala, Ada Prathaman is mostly made with rice. Ada Payasam is mostly made with Maida Ada in Tamil Nadu. There is a slight difference in the recipe of maida ada payasam and rice ada payasam. Similarly, there is a slight difference in taste.

Maida Ada - 1/2 cup

Sago pearls - 1/4 cup

Thick coconut milk – 1 cup

Water – 3 1/2 cups

Powdered jaggery – 1 cup

Ghee - 3 tbsp

Cardamom - 4

Cashew nuts - 2 tbsp

Raisins - 2 tablespoons

Chopped Coconut(finely chopped) - 2 tbsp

Recipe

Break the adai into 1/2 cm pieces. Heat a pan and fry the adai. Fry till adai turns golden brown. Only then it will not stick to each other while making the payasam. Transfer the fried adai to a plate.

Now in the same pan add ghee and add cashew nuts and fry until golden brown and transfer to another plate. Then in the same pan add dry raisins and fry and transfer to another plate. Then in the same pan add coconut pieces (finely chopped) and fry until golden brown and transfer to another plate.

Pour water in a deep vessel and let it boil. Once it boils, add sago to it and mix with a spoon. Doing this will prevent the sago from sticking to the pan.

Then cover the pan and boil. Stir occasionally with a spoon. Otherwise the sago will stick to the bottom of the pan.

When sago is half cooked, add the adai and stir. Boil the adai without covering the pan. If you cover it, it will overflow. So avoid closing.

Stir occasionally with a spoon. Simmer till the ada is cooked well. Take a small piece of adai and eat it to see if it is done. 

Now add the cardamom. In a separate bowl add some water to the jaggery and boil it and filter it. If it is pure jaggery then no filtering is required.

Add jaggery water to adai and mix well with a spoon. Then add coconut milk and mix.

Once coconut milk comes to a boil, stir in the roasted cashews, dried raisins and coconut pieces and remove from the fire. Now delicious Adi Payasam is ready.

Serve with banana and papadam.

Note

Grate a freshly cracked coconut and add a little warm water and extract coconut milk. If it is difficult to make coconut milk at home, you can buy ready-made coconut milk from the store and use it. Homemade coconut milk is not only healthier but also the taste of payasam varies.